Sunday, February 28, 2016

Art 1: Oaxacan Sculptures, Part 1

OAXACAN ANIMAL SCULPTURES


Introduction to Oaxacan Sculpture:
CLICK FOR OAXACAN PREZI

Introduction to Papier-Mache:
CLICK FOR PAPIER-MACHE PREZI


Important Unit Vocabulary:

Form- an element of art that is three-dimensional and encloses volume; includes height, width AND depth

Sculpture- the art of making three-dimensional representative or abstract forms; carving, casting, assembling.

Papier-mâché- a composite material consisting of paper pieces or pulp, sometimes reinforced with textiles, bound with an adhesive, such as glue, starch, or paste.


Students:  You will be creating a paper mache 
Oaxacan Animal Sculpture!  

1.  Build your FORM by bunching together crumpled up pieces of newspaper.  You can manipulate the newspaper by twisting, rolling, crinkling, folding, balling it up, etc.  Then, use masking tape to attach various body parts.  

Below is a good video on the sculpting/building process.  You can make a cardboard base if you want to, but it is not required.  Remember that you are working on a MUCH smaller scale!  
CLICK HERE FOR SCULPTURE BUILDING VIDEO

*DO NOT MAKE BOXES WITH STICK LEGS!  :)


*Pay close attention to the shapes you are making!  Make sure you are creating curved hips and shoulders, necks, etc.  


More examples:


Sunday, February 21, 2016

Applied Art: Sculpture; Coil Pots

COIL POTS


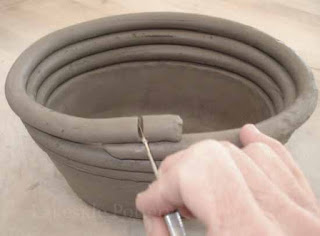
Now that you have had some experience with clay, it is time to move on to another construction technique.  The next technique you will work on is creating COIL POTS.

COIL POTS are clay vessels that are created by attaching rolled coils of clay to each other to build or construct a piece of art.


Please view the following demonstration before beginning your coil pot:


Things to consider before you begin:
  • What am I making?  A bowl?  A candle holder?  A pot for a plant?  Decoration?  Pencil cup? Mug?  Teapot?  Pitcher?  Vase?  Etc.
  • How does the purpose influence the design?  Example:  A mug should not have holes in it!  :)
  • What size is my piece going to be?  Your project MUST be at least the size of a can of soda. 

BE SURE TO:
  • WEDGE YOUR CLAY- Redistributes water and lessens the chance of bubbles!
  • Slip & Score your pieces really well to make sure they lock together!  Click here to see a review on the SLIP & SCORE METHOD
  • Close up the bag of clay when finished taking a new piece
  • Clean up all supplies you used and wipe down your work station thoroughly
  • WET AND WRAP YOUR CLAY!  Make sure your clay is as wet as you need it to be and wrapped properly so it does not dry out until you are ready for it to!
  • Store your work somewhere safe.  I suggest you store it in a box with your name on it.  Always out your initials on the bottom of your finished piece so you know it is yours!